How to Compress an Image to 100 KB (or 50 KB, 20 KB)
Job portals and visa forms want photos under 100 KB, 50 KB or 20 KB. What makes a file small, a worked example with real numbers, and the mistakes to avoid.
Computing··9 min read
To get a photo under 100 KB, do two things in this order: make it smaller in pixels (around 1200 pixels on the long side is plenty for a form), then save it as a JPG at whatever quality fits. Skip the first step and you'll still hit the size, but the picture will look like it was faxed.
That's the whole trick. The rest of this post shows why it works, with numbers we measured on a real photo, and covers faces, signatures and the mistakes that make files stubbornly large.
Why forms have size limits
Job portals, exam boards and visa sites take uploads from huge numbers of people, and every file has to be stored, checked and often shown or printed at a small fixed size. A 5 MB phone photo carries far more detail than a passport-sized box on a form or an ID card can use. So sites set a ceiling, and sometimes a floor too.
The numbers vary a lot, so read your form's own instructions. Two real examples:
| Form | Photo file size | Other rules |
|---|---|---|
| India e-Visa | 10 KB to 1 MB | JPEG, height and width equal |
| UK passport, online | 50 KB to 10 MB | at least 600 × 750 pixels |
The same India e-Visa form wants the passport page as a PDF between 10 KB and 300 KB. Note that both have a minimum. Squeeze a picture too hard and it can be rejected for being too small.
What makes an image file big
Three things, in order of how much they matter:
- Pixel dimensions. A 12-megapixel photo has 12 million pixels to describe. Halve the width and the height and you have a quarter of the pixels, and roughly a quarter of the file.
- Format. JPG and WebP are built for photos: they throw away detail your eye barely notices. PNG keeps every pixel exactly, which is great for screenshots of text and terrible for photos.
- Quality setting. For JPG and WebP, a number from 1 to 100. Lower means smaller, with blockier detail.
We measured the first one with our Image Compressor. The test photo is a public-domain picture of Yellowstone in winter, cut to 4032 × 3024 pixels and saved as a 4.6 MB JPG, the kind of file a phone camera hands you. Snowy trees are a lot of fine detail, which makes this a hard photo to shrink. At the same quality, 75, only the pixel size changes:
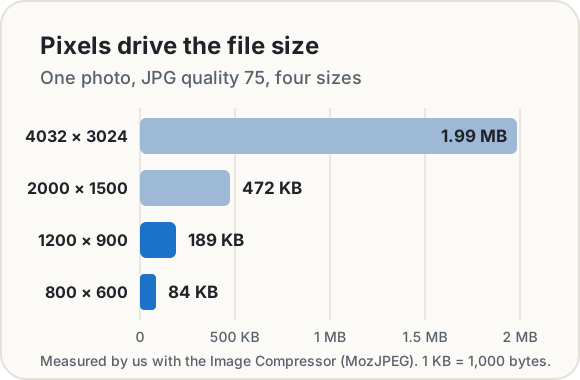
Going from 4032 to 800 pixels wide took the file from 1.99 MB to 84 KB. No quality slider gets you a drop like that without wrecking the picture.
A worked example: one photo, 100 KB
Here's the same photo through the compressor's Target size mode, which encodes the picture for real at different qualities and keeps the best one that fits.
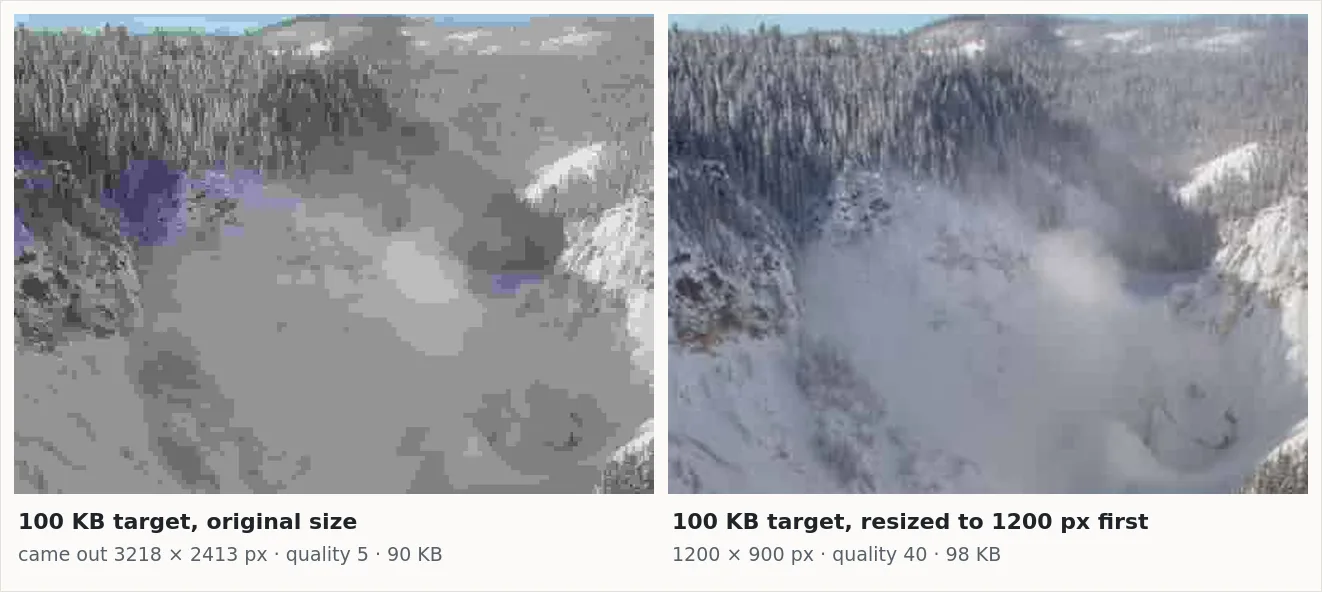
First, without resizing. We asked for 100 KB and left the size alone. Even quality 5 was too big at 4032 × 3024, so the compressor shrank the picture to 3218 × 2413 and settled on quality 5 at 90 KB. It fits. It also looks awful: smeared snow, blocky trees and purple blotches where the colour gave up.
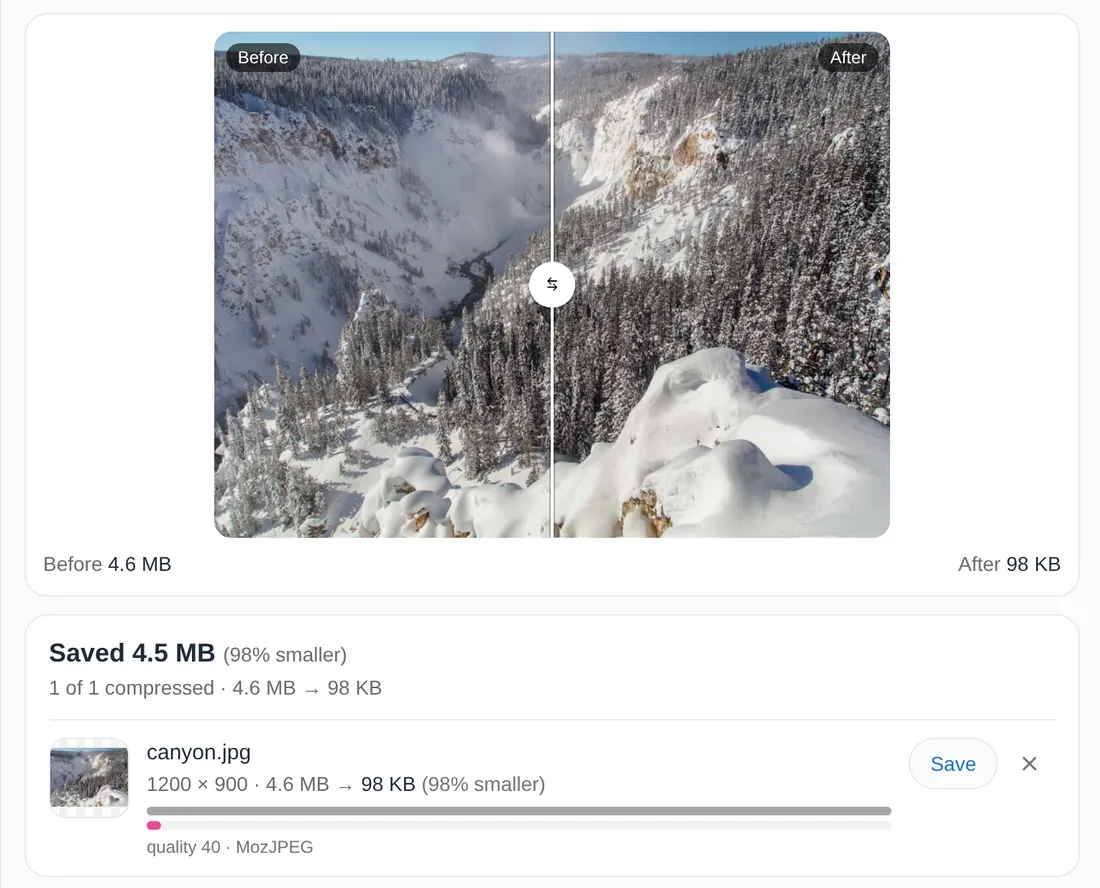
Then, resized first. Same target, but with Longest side set to 1200 pixels under More options. Now the compressor could afford quality 40, and the file came out at 98 KB, 98% smaller than the original.
Put the same area of both results side by side and the difference is obvious:
For smaller targets, go smaller first. These are the settings that fit on our test photo:
| Target | Longest side | Quality found | Result |
|---|---|---|---|
| 100 KB | 1200 px | 40 | 98 KB |
| 50 KB | 800 px | 46 | 50 KB |
| 20 KB | 600 px | 29 | 20 KB |
An easier photo, such as a portrait against a plain wall, will fit at a higher quality. If the form gives exact pixel dimensions, use those instead.
How quality trades against size
Holding the size at 1200 × 900, here's what the quality setting alone did:
| JPG quality | File size |
|---|---|
| 95 | 664 KB |
| 75 | 189 KB |
| 50 | 116 KB |
| 40 | 98 KB |
| 30 | 78 KB |
The top of the scale is expensive: dropping from 95 to 75 cut the file by more than two thirds, and you'd struggle to see the difference on a phone screen.
Keeping faces sharp
For a photo of a person, the face is the only part anyone checks, so give it the pixels:
- Crop first. Head and shoulders, not half the room. A tight crop means the 100 KB goes on the face instead of the wallpaper. Our crop tool has fixed ratios such as 1:1 for forms that want a square.
- Resize to what the form needs, not less. If it asks for at least 600 × 750 pixels, don't send 400 × 500 to save space.
- Check the result zoomed in. Drag the before and after slider over the eyes. Blocky skin and smeared eyelashes mean you went too far: use a smaller pixel size at a higher quality instead.
- No filters or retouching. Official photo rules often forbid it. The UK's passport rules say the photo must be "unaltered by computer software", so beauty modes and background swaps are out. Crop and resize, nothing more.
Signatures
A signature is a few dark lines on white, so it should be tiny. What makes it big is everything else: a phone photo of a whole page, shadows, and the grain of the paper.
- Sign with a dark pen on plain white paper, in good daylight, with no shadow from your hand or phone.
- Crop tight around the signature.
- Make it small: 600 pixels wide is plenty for most forms.
We tried it with a made-up signature photographed on slightly textured paper: 1600 × 600 pixels, 290 KB. With a 20 KB target and the longest side set to 600 pixels, it came out at 19 KB as a JPG, at quality 89, with clean edges.
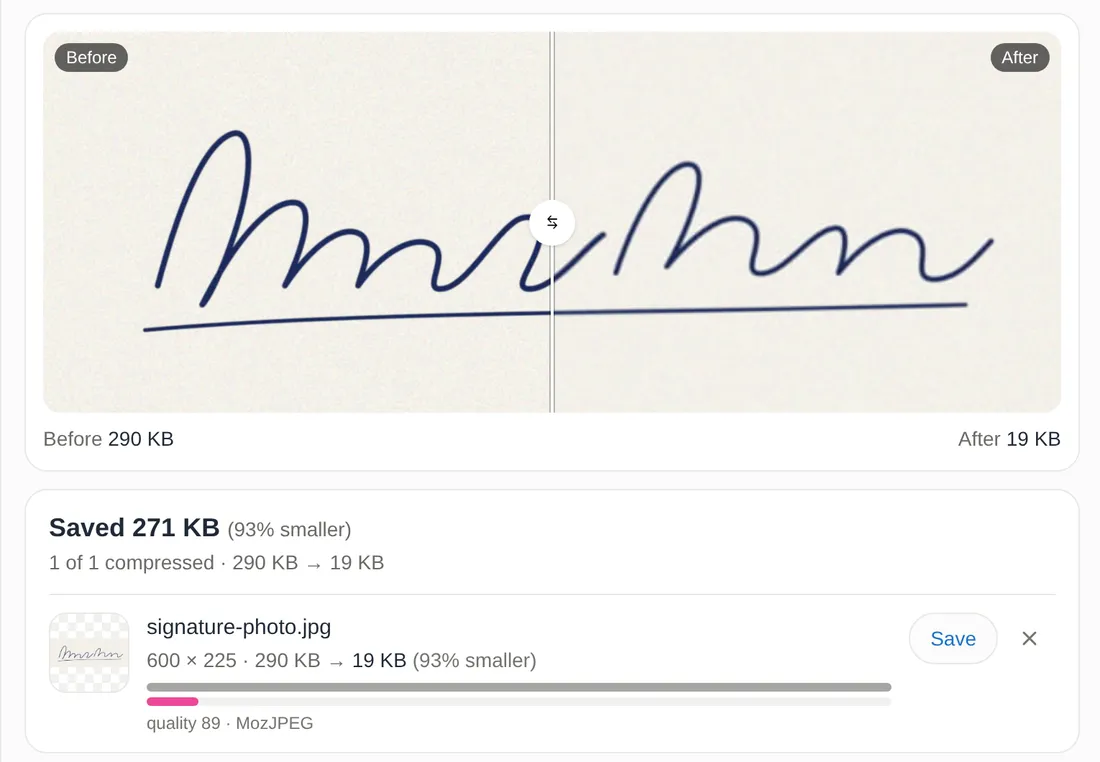
You might expect PNG to win for line art, and for a clean digital signature it does. For a photo of one, the paper grain gets in the way: as a 16-colour PNG at 800 pixels it was still 92 KB. Stick with JPG unless the form insists on PNG.
Common mistakes
Uploading a screenshot of a photo. Screenshots are often saved as PNG (a Mac's default screenshot format is PNG), and they capture the screen's pixels, not the photo's. You get a big lossless file of a slightly worse picture. Use the original photo instead.
Saving photos as PNG. In our test, the 1200 × 900 photo was 2.1 MB as a lossless PNG and 189 KB as a quality-75 JPG: 11 times bigger, for no visible gain. PNG is for screenshots of text, diagrams and logos.
Choosing WebP for a form. WebP is a great photo format: Google reports lossy WebP files are 25 to 34% smaller than comparable JPGs. But many forms only accept JPG (the India e-Visa photo must be a JPEG), so check before you convert.
Landing exactly on the limit. Some software counts 1 KB as 1,024 bytes, a habit from early computing that the binary prefix "kibi" was invented to clear up. So a tool's "100 KB" file can be 102,400 bytes, which a site counting in thousands will reject. Our compressor counts 1 KB as 1,000 bytes, the stricter reading, so its 100 KB fits either way. Still, leave a few KB of room.
Compressing a JPG again and again. Each save throws away a little more detail. Start from the original photo each time you try new settings.
The short version
- Resize first: about 1200 pixels on the long side for 100 KB, 800 for 50 KB, 600 for 20 KB.
- Save photos as JPG, then let a target-size tool find the best quality that fits.
- Crop tight around faces and signatures, and check the result zoomed in.
- Don't use PNG or screenshots for photos, and read the form's minimum as well as its maximum.
Our Image Compressor does all of this in your browser. The photos are compressed on your own device and never uploaded, which matters when the picture is going on a passport or visa form.
Sources
- Government of India. e-Visa application: photo and passport page requirements. Indian Visa Online.
- GOV.UK. Photos for passports: digital photo rules.
- Google for Developers. An image format for the Web (WebP).
- Apple. Take a screenshot on your Mac. Apple Support.
- National Institute of Standards and Technology. Prefixes for binary multiples.
- ITU-T T.81, ISO/IEC 10918-1. JPEG: digital compression of continuous-tone still images.
- Mozilla. MozJPEG, the JPEG encoder our compressor uses.
- Test photo: US National Park Service, Views of Lower Falls from Inspiration Point, public domain. All file sizes measured with our Image Compressor in Chrome, October 2026.
.jpg)
Keep reading
Computing · Oct 9, 2026 · 8 min
What Is a HEIC File, and How Do You Open It?
HEIC is the photo format iPhones save by default. Why Windows, Android and upload forms often can't open it, and the cleanest ways to turn it into a JPG.
Computing · Oct 8, 2026 · 6 min
How to Edit Photos Without Uploading Them
Crop, adjust, blur and add text to photos in your browser without sending them anywhere: what EXIF location data is, and how to check nothing is uploaded.
Computing · Oct 9, 2026 · 12 min
Cron Syntax Explained, With Examples You'll Actually Use
Read any cron expression field by field, copy 14 everyday schedules (every 5 minutes, weekdays at 9), and avoid the traps that make jobs run at the wrong time.
Computing · Oct 9, 2026 · 8 min
What Is a HEIC File, and How Do You Open It?
HEIC is the photo format iPhones save by default. Why Windows, Android and upload forms often can't open it, and the cleanest ways to turn it into a JPG.
Computing · Oct 8, 2026 · 6 min
How to Edit Photos Without Uploading Them
Crop, adjust, blur and add text to photos in your browser without sending them anywhere: what EXIF location data is, and how to check nothing is uploaded.
Computing · Oct 9, 2026 · 12 min
Cron Syntax Explained, With Examples You'll Actually Use
Read any cron expression field by field, copy 14 everyday schedules (every 5 minutes, weekdays at 9), and avoid the traps that make jobs run at the wrong time.